Both were a quickie install with not a lot of pics so i figured might as well combine them
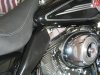
Here is what it looks like stock

Install the head bolt covers with the caps with 2 set screws in each tighten the set screws into the caps little tricky to tighten but can be down

Then install the bridge 2 screws go down though it if you install it with the allen wrench they sent you good luck .. I found it easiest to use a Allen Wrench on a 3/8 socket bit it was short enough to fit in there finger tighten then use the wrench they sent to tighten the rest of the way

Now on to the saddleshields
You have to install the nuts into the frame plate they send them to you as a crush nut where you install them .. pretty easy on the 08's pre 08 lot more involved by the instructions ..

The side Covers top screws are little hard to tighten but can be done the right side is the worst as you basically have to rub the cylinder fins the whole time unless you got a tiny hand
Now that i got them installed i notice when i add a oil gauge i will have to try to modify the shield to fit


Here is what it looks like stock
Install the head bolt covers with the caps with 2 set screws in each tighten the set screws into the caps little tricky to tighten but can be down
Then install the bridge 2 screws go down though it if you install it with the allen wrench they sent you good luck .. I found it easiest to use a Allen Wrench on a 3/8 socket bit it was short enough to fit in there finger tighten then use the wrench they sent to tighten the rest of the way
Now on to the saddleshields
You have to install the nuts into the frame plate they send them to you as a crush nut where you install them .. pretty easy on the 08's pre 08 lot more involved by the instructions ..
The side Covers top screws are little hard to tighten but can be done the right side is the worst as you basically have to rub the cylinder fins the whole time unless you got a tiny hand
Now that i got them installed i notice when i add a oil gauge i will have to try to modify the shield to fit
Last edited by a moderator:
")