Well, here is what I ended up doing....
As I began to consider this project some of my initial considerations were;
Which radio?
Bluetooth capable? Surely in today’s world there are Bluetooth capable ham radios.
Weather resistance? There is no fairing on a Road King. Whatever radio I use will be exposed to the weather.
Which antenna to use?
Location of the main radio body?
Initially I considered installing it into one of the saddle bags. But, I was not enthused about drilling holes into a brand new saddle bag. For one thing, I have the leather covered saddle bags. A hole might expose the edge of the plastic bag and the leather veneer. Allowing, at some point, moisture to get between the plastic and leather, separating the leather from the plastic. I looked into buying a used bag. Saving the new bag that came with the bike for a time that I might sell the bike. But, then I thought how the stored bag would not be weathered like the one that remained on the bike. So, I would have to buy a used set of bags. And, I would have to store the new bags. And, I found, a set of used bags start around $250.00 and go up from there depending on their condition. And, the saddle bag is where one keeps one’s “stuff”. I was not enthused about losing valuable storage space. And, though small, I was finding that the radio was not neatly fitting into a corner of the saddle bag.
Location of the antenna? I thought how I could build a mast for the antenna to get it up above the riders’ heads. Using it as a flag pole now and then. But that seemed too involved. At least at this initial stage. Perhaps later. And, the bracket MARC sells seemed like a good way to attach the antenna. But it seemed too small for the 5' 2" tall antenna I was considering.
How to get the wires from the main radio to the handlebar area for the remote head, and to wherever the antenna ends up? I figured I would route the wires from wherever the radio main body was, to the handlebar location under the seat and gas tank somehow. But to the antenna at the rear of the bike? Under the fender? Then through the fender close to the antenna mount? The thought of drilling a hole in the fender was not something I felt comfortable with. Not only the hole itself and the resale issues, but to drill a hole and have to paint the circumference of the hole to keep it from rusting. Even if I used a rubber grommet I could have rust in the fender. And to paint it in a manner that would be of the same quality as the OEM paint job.... That is beyond my know how and abilities.
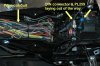
How to make the system easily removable in the event that I am on the road and want to take it into the hotel room with me? If I am to have the ability remove it then I have to address wires that will be hidden under the seat and gas tank. I decided to make splices in the wires as needed to be able to disconnect the various parts and take them with me without having to disassemble the entire motorcycle.
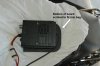
How to maintain the IP57 water and dust resistance feature of the radio with any adjustments I may make. Though I was not able to find IP57 rated 3.5mm stereo plugs for the EXT speakers and the LINE IN, I was able to find IP68 rated DIN connectors. I needed 7 pin DIN connectors to be able to splice the remote head cable. After searching online I came across a company that sells connectors of various water and dust resistance ratings.
Well, I decided on the Yaesu FTM-10R. For two main reasons. One being the bluetooth capabilities so I would not have to be wired to the radio. And the other being that they advertise the radio specifically designed for the use I was looking to use it for. There was an earlier model. But it has less power and was discontinued because of it. Yaesu claims that the FTM-10R remote head is water resistant to 3 meters for 30 minutes. That the radio itself is built to withstand the rigors of off road use in ATVs, 4X4s, and on motorcycles. And, on a Harley, it will have it’s share of vibrations.
")
MARC President Ray Davis was kind enough to give me some direction about antennas. Though Casper had only recently broken and he was addressing the challenges associated with that, he took some time to guide me to antennas that he has found to be good for our use. He told me how Comet has designed a few of their antennas for use on motorcycles. The current Comet “Big Dog on the block” seems to be the CSB-790A. So I picked one up when I bought the radio.
Comet claims the CSB-790A to be the “NEWEST & BEST” high gain 2M/70cm dual band mobile antennas. It’s specifications are;
Gain & Wavelength:
2M: 7/8 wave 5.1dBi
440MHz: 7.7dBi Three 5/8 waves in phase
VSWR: 1.5:1 or less
Max Power: 150W
Length: 62"
Connector: Gold-plated PL-259
Threaded collar fold-over hinge included. Which is a nice feature when putting the bike away in the garage.
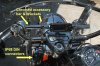
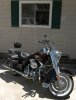
Location for the radio main body came as a result of a comment from another MARC member. Who, by the way, has a really sweet looking Fireman’s edition of a Road King. He mentioned how he used a saddlebag guard bag for the location of his radio. I had recently picked up a pair from a Craigslist ad. They were like new. I decided to use one of them for the radio main body location.
I have really enjoyed meeting the challenges this project has provided.
One of the challenges was to find a way to attach the antenna. I had not, as yet, decided where I would place the radio main body. But I knew I would need an antenna bracket, and so I started here. I went with a similar unit to the one MARC sells. Except that I made my own. One of the features of my bracket is that it is made of 5/8" X 1 ½" aluminum. I wanted it to be plenty strong to meet the demands that a 5' 2" tall antenna would require. I decided where I wanted the cutouts for the rack tubing to be and ran the aluminum across my table saw to give the drill bits a pilot to follow. Then, I clamped the top and bottom pieces together and started drilling holes for the book rack tubes. I used my drill press and started with a small drill bit and worked my may up to the ½" and 5/8" holes for the rack tube.
Once fabricated I started doing some homework about the thread size of a PL259 and a UG363 bulkhead that the PL259 would attach to. I eventually received an attachment of a drawing of a bulkhead. It showed a lot of detail. The outside dimension, the thread count per inch, and more. After some homework on the internet I came across McMasters. They had a tap and a matching bit to do the job at a reasonable cost. So once the hole was drilled and taped I threaded a 2" bulkhead into the bracket with some Locktite. Making sure it was adjusted so the antenna base would provide some slight resistance against the bracket so it would be securely attached. I then installed the jam nuts that came with the bulkhead.
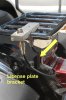
Then I fabricated a bracket to attach to the license plate mounting bracket. In it I drilled and taped a hole for another bulkhead. Then, again with Locktite and jam nuts, I fastened the bulkhead to this bracket. Eventually an antenna cable would run from the radio main body to this bulkhead and from the bulkhead to the antenna.
By now I had decided to keep the radio main body in the saddlebag guard bag. The radio has the remote head cable coming from one end and the power, antenna, EXT speaker, and LINE IN connections at the other end. I did not want the radio to lay on one of the wires. And, because of the size of the radio main body in relation to the saddlebag guard bag, wires were going to be at the bottom and the radio would be resting on it, or them. So I fabricated a board to attach the radio to. This board, made of 1/4" plywood and painted black, was made to fit the contours of the inside of the bag. By attaching the radio an inch or so from the bottom edge of the board the board would allow the wire, in this case the remote head cable, to be free from the constant pressure of the radio resting on it.
Eventually I began to think about how, and where, to locate the remote head at the handlebars. I did not want to attach a large black plastic bracket to the handlebars without consideration for the overall look of the bike. Harley Davidson goes to a lot of effort to make their bikes look like Harley Davidsons. I wanted to maintain the general theme of the design. And, I also wanted the remote head centered in the windshield. Rather than being set off to the side. Maintaining an evenly distributed, balanced look. So, eventually, I ended up contacting some handlebar retailers in an attempt to purchase an “Ape Hanger” that had a sufficient length in a straight part of the bars for a 13 ½" piece. I figured I would simply find a bar and cut out the section I needed. Then I learned that you should not cut a chromed pipe. Or, anything else for that matter. That by doing so the chrome will begin to peel. Eventually I ended up talking to Buddy at Paughco. A company in Nevada who manufactures motorcycle handlebars. I gave him the dimensions, he got it cut, chromed, and shipped it to me.
I purchased some handlebar clamps from Kuryakyn to attach the 13 ½" chromed bar. I also went to the Home Depot, picked up some threaded rod and a chromed toilet supply line. This supply line would cover the threaded rod. I used zinc coated neoprene lock nuts as fasteners. Once assembled this set up gave me a nice place to attach the remote head and, perhaps eventually, an Ipod, and/or speakers, and/or GPS, and/or another piece of equipment.
Once the parts were gathered I removed the book rack, passenger back rest, seat, and gas tank. I found a wire conduit under the tank and used it for routing the wires to the handlebars.
So as not to get them confused, I painted the ends of one the stereo cables white with “White out” from my wife’s desk.
I have attached some photos of the project.