free website stats program taking apart my evo dyna for base gaskets | Page 6 | Harley Davidson Forums

taking apart my evo dyna for base gaskets

I got some of the permatex gasket remover, man I wish I had gotten it sooner! but that stuff is nasty!

2nd piston is all gapped and fitted up, I will spend some time cleaning up the cases in the next day and I think then she is ready for reassembly

OOOPS, forgot to tell you it burns the skin, but it works great on stubborn gaskets
 
Not too bad.... did you see anything of interest in the pictures?

Sent from vacation land

lunchtime update, cylinders on, heads placed on, home made chicken soup, then back to out to torque it all down.
 
Last edited by a moderator:
Good to hear your making progress, how are your finger tips from the gasket remover? Did I forget to tell you to wear gloves SORRY, good luck cant wait to hear you say it runs and no leaks, Capital Jack:s
 
I did just fine with the gasket remover, I just wish I had been more proactive and gotten it before I scraped all the gasket off of the cylinders, I used gloves and sprayed it on a rag to get the little bit off of the case side.

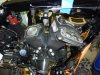
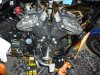
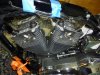
So I walked away today with the front cylinder completely bolted down, the rear is all torqued and ready for the rocker boxes.

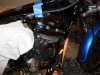
I got a lot done over winter vacation and now I am just going to give it a couple of hours each weekend, next weekend the rear should be done and the carb all mounted and plumbed, the streets are icy and its cold so I am in no big rush, my garage gets chilly mid day even with 2 heaters going!!!!


I guess my next research will be ring break in/ heat cycle

thanks for all your help and to jack for checking up on me!

I have pictures but I'm watching football!!!

pictures
 

Attachments

  • P1010055 (Large).jpg
    P1010055 (Large).jpg
    83.2 KB · Views: 18
  • P1010056 (Large).jpg
    P1010056 (Large).jpg
    86.4 KB · Views: 17
  • P1010057 (Large).jpg
    P1010057 (Large).jpg
    95.6 KB · Views: 17
  • P1010058 (Large).jpg
    P1010058 (Large).jpg
    86.5 KB · Views: 15
  • P1010059 (Large).jpg
    P1010059 (Large).jpg
    66.9 KB · Views: 14
Last edited by a moderator:
Looking good I can almost hear it run from here, you are doing a great job and have a nice photo collection to look back on and be proud:s
 
I am starting to get anxious about her running! but we have over a foot of snow on the way tonights so slow and steady she goes.

thanks for all the encouragement

I hope the pics help someone later on down the line, I know all the ones that I have found have helped me
 
Don't forget to get the manifold bolted up before you torque the back head. It not only makes it easier, but may help performance by being perfectly aligned to intake ports.
 
I have been busy with other things so today was the first time in a few weeks I got to go into the garage and with the snowstorms motivation is way down!

She is all back together except for the battery box and the fuel tank, I almost don't want to finish it because I couldn't ride it if I wanted to with the snow all over the place!

Maybe next week:D

battery is in, I re-glued the tank trim panel rubber strips so I didn't put the tank on yet, I had changed it to chrome but its all scratched up so I am going to use the original black w/chrome gauge housing....I think next sunday she will fire!
 
Last edited by a moderator:
battery is in, I re-glued the tank trim panel rubber strips so I didn't put the tank on yet, I had changed it to chrome but its all scratched up so I am going to use the original black w/chrome gauge housing....I think next sunday she will fire!

I can hear it from here, Good Luck:p
 
today was the day....I can't explain how proud of myself I am, I know this isn't a big deal for some but for me it was a major stepping stone! I am haven't taken her on the road yet to really warm her up, because of all the snow and salt but here she is @ 1000 rpm to 3000 rpm, the motor sounds quiet no giant puffs of black smoke!

[youtube]bnp1NTtd-Ls[/youtube]
 
Back
Top