Hi everyone,
I own a 2010 FLHX (Canadian version).
On rear fender right below the license plate are these 3 lines/light strips. I had actually put up another thread the other day about the actual part number.
However, I leaned under the bike today & was shocked to see that there is an actual part there.. all bolted to the fender and there is a wire there which goes all the way up on the inside of the fender. No clue where it stops.
My question is !!! How do you get these lights to work ?. Possible all is there except for bulbs ?
Thanks for your help.
Rgds, Shawn
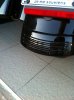
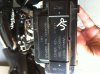
I own a 2010 FLHX (Canadian version).
On rear fender right below the license plate are these 3 lines/light strips. I had actually put up another thread the other day about the actual part number.
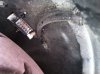
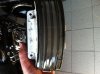
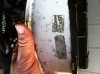
However, I leaned under the bike today & was shocked to see that there is an actual part there.. all bolted to the fender and there is a wire there which goes all the way up on the inside of the fender. No clue where it stops.
My question is !!! How do you get these lights to work ?. Possible all is there except for bulbs ?
Thanks for your help.
Rgds, Shawn