free website stats program Not starting after a winter plugged into a tender | Harley Davidson Forums

Not starting after a winter plugged into a tender

Avalon635

Member
Hey everyone,
Had a tender put on my bike last summer so I don't have to take the battery out for the winter.
Well, went to start it today after the winter season and the bike just clicked and clicked. So, I put the tender back on and it showed it was charging. Went out a bit later and tried again and the click was way faster. Just confused.....isn't this tender supposed to keep the battery charged? Gonna wait until tomorrow and try again. I really am getting down on my Sportster since I got it so many issues.
 
You really should not be having any issues after being hooked up to a tender all winter, any chance it could have came unpluged? You might think about pulling the battery out and cleaning the terminals as well as testing the battery, sometimes after winter storage you can get a little corrosion and possibly the terminals could have been a little loose when you put her up for the winter. And there's alway a possibility of the tender going south, you won't think so being new last summer, but sometimes murphy's law figures in. Good luck
 
Thanks, I know what your saying and was hoping not to have to do that cause I screwed up last time putting in the battery and that is why I got the tender. I am new to all of this and just hate the thought of screwing with that darn battery again. But if I ride it I should know how to work on it right. So, I will take a chance and try that.
Thanks again
 
First time is always the hardest, just remember to disconect the negative terminal first and when going back together conect the negative last, let us know what you fine wrong.
 
Figured a pic is worth a thousand words, the following is how you disconnect the negative cable first. Hope it's some help:)

Remove Maxi-Fuse and holder from battery strap by grasping holder and sliding it toward the rear of the motorcycle. Then remove Maxi-Fuse
holder from its mounting pin on battery strap.
Remove battery strap screw and flat washer Unhook battery strap from battery tray mount on top of battery and remove strap.

WARNING
Prevent accidental vehicle start-up, which could cause death or serious injury. First disconnect negative (-) battery cable at engine and then positive (+) cable from battery.


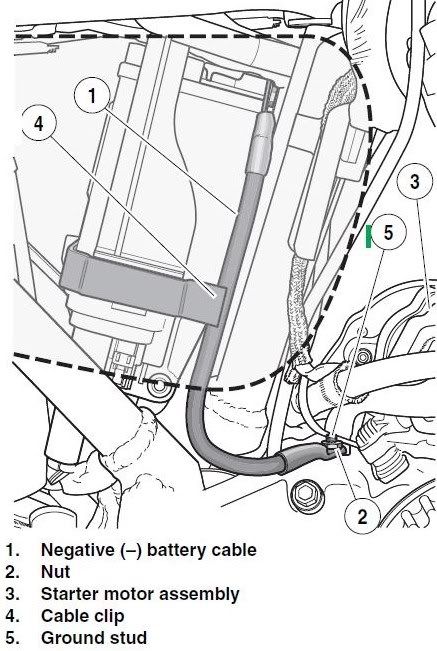
See Figure 1-17. Remove nut (2) that secures negative (–) battery cable (1) connector to ground stud (5) on crankcase boss behind starter motor assembly (3). Remove cable connector from stud.
5. Pull end of negative (–) cable forward gently to free it from cable clip (4).
Make sure negative (–) battery cable does not touch any grounded point on the motorcycle while disconnecting the cables from the battery positive (+) terminal in the next step. If the positive (+) cables should contact ground with the negative (–) cable grounded, the resulting sparks may cause a battery explosion which could result in death or serious injury.
Lift up protective rubber boot covering battery positive (+) terminal (2). Unthread screw from battery positive (+) terminal and remove positive (+) battery cables.
Disengage positive (+) battery cable (2) from cable holders (1).
Remove battery from battery tray. Note routing of negative (–) battery cable around frame downtube (see Figure 1-17.).
XL06Battery.jpg

Figure 1-17
 
As long as you pull the main fuse out, and avoid any metal contact to the frame or metal parts you should be okay either way, just safer to disconnect the negative stud (5) by removing nut (2) from Chopper's post above.

Get the battery load tested, then get all the heavy primary red and black heavy guage wire terminals shiny and flat with a pocket knife. Don't forget to use dielectric grease HD ($9.99) or O'Reillys/Kragen for ($6.99) to put on all contact surfaces.
 
Last edited:
NEWHD74FAN I can't tell you how much chrome I have destroyed by avoiding any metal contact, especially on a XL, and that not a opinion it's unfortunately experience, and pulling the maxi-fuse any metal part is still a ground :hii
 
True, just that you have to be extra careful on XL's (mine in partiicular) has plenty of metal/chrome everywhere as you stated.

It is an easy precaution to insulate your wrenches, heatshrink tubing over your nutdriver, screwdriver shafts, extensions and like as a precaution for tools used for battery service. Working on cars, also had special kit of tools for battery service. No problems, just be prepared and cautious...thats all. Also handy was is a tiny offset battery ratchet wrench with cushioned handle (similar to GM side terminal battery dedicated one). I have it packed in my bike toolkit just for removing motorcycle terminals, no messing with different setup tool parts.
 
Last edited:
Welcome to the forum Anita and i hope you get your battery sorted out.
I have a fairly new battery in my Sportster (bought the bike new in Dec 08) and only 1700 on the clock. I always keep it on an Optimate 4 tender in my garage when not riding but have found recently that the battery has just died. Brought it back to the dealer and they put it on a car charger (this can damage the motorcycle battery plates) and said all was well. I rode it home and put it back on the tender but it's showing the light for recovery charge and staying in that cycle which the tender manual says means the battery's had it.
Very frustrating when you think that you have done all the right things. I'm not sure if battery's are covered by the warranty but I'm getting a new one as I hate not being able to depend on it. When I get the chance, I want to be able to ride, not keep messing about with a sick battery. I just hope it was a dud battery and not that there is something wrong with the bike which will cause the same problem with a replacement battery.:wall
 
Back
Top