free website stats program Gerbing Dual Controller mounting question. | Page 2 | Harley Davidson Forums

Gerbing Dual Controller mounting question.

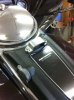
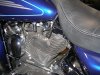
Here is what I decided to try. It is made from a 1/2" wide piece of stainless steel. I bent it around a 1" x 1/2" piece of solid bar stock. The fasteners are stainless. Locknut and a washer on the back side. Between the mounting bracket and the plastic is a small piece of EPDM rubber (adhesive backed) that I cut to shape. The lid of the gas cap has a about 1/2" of space from the top of the knobs, in the open position and the hand grips have about the same, lock to lock.

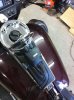
I can use the portable dual controller like this when it is in the case with the belt clip. I can easily take it with me and if the dual controller ever fails, it will be very easy to replace. It is easy to get to the knobs now while riding and I can do it without looking down. I will polish the SS bracket to a mirror finish later, to match the chrome. I also plan to make a plastic "clip" from some Kydex to add some thickness to the SS portion where the belt clip attaches. This will make it a little more snug and reduce any wear from vibration (SS on the belt clip). It will just pop on and off easily.
 

Attachments

  • Dual Controller mount.JPG
    Dual Controller mount.JPG
    57.9 KB · Views: 102
  • Dual Controller.JPG
    Dual Controller.JPG
    65 KB · Views: 92
Wow, looks very well done! thanks for sharing that...not sure I could cobble something that nice together and have the cajones to put screws through my panel but you made it look very good...

Phil
 
I finally got the gerbing controller mounted on the fairing. I put the controller itself down near the battery box and ran the cables for the knobs thru the wiring harness under the gas tank. The knobs are mounted near the tach and speedodmeter. The cables that attach to the jacket come out by the seat. Some photos attached.
 

Attachments

  • PC300209_2.jpg
    PC300209_2.jpg
    62.8 KB · Views: 85
  • P1010214_2.jpg
    P1010214_2.jpg
    79.2 KB · Views: 76
  • P1020213_2.jpg
    P1020213_2.jpg
    88.3 KB · Views: 77
  • P1010219_2.jpg
    P1010219_2.jpg
    106.9 KB · Views: 73
Nice work MJB!
I like that you put one on each side of the fairing. Don't know if I would have thought of that. I would have probably tried to keep them "paired" and then would not have thought about splitting them like you did until after drilling the holes.

Question: What holds the LED light in place from the back side? Press fit? Little dab of silicone caulk?

I am also looking for a good case that I can use or modify to mount my iPhone to the clip I made. It is a good position to run MP3's to the input on the stereo.
 
I used some black permatex silicone to keep the LED's in place, being carefull not to get any on the visable portion. I didnt want any water to leak through either, so it worked well.
 
I had the same problem finding a suitable spot for the controller. I did not want to mount in fairing , because it would have to go with bike if I ever let it go. So I bought a Heat Troller dual control, better than gerbing controller, and Velcroed it to the bottom of the left control on handle bars. Works great, easy to see and use while riding. With left hand. During the summer I just pull it off and put it into the pouch I have on the bike. You can see it in the picture.


Heat-Troller-mount.jpg
 
I had aset of the Gerbin's with dual controls, all I did Was put a piece of velcro on my tank and place in front of me . could use without any problems. Summer I would ues a heat gun and takt velcro from tank,store suit and controls until winter.

Jim Welch
 
Found info on the Heat Troller in the BMW forums. Those guys all use heat gear.

Enter the Heat-Troller. This advanced device allows for precise, stepless control of heat level from off, to full power. Better yet, it is a “non-resistive” controller. When set for less than full power, it’s only using a proportionate fraction of your heated gear’s full rated power draw. This is vitally important since most motorcycles have a fairly limited excess alternator capacity. The Heat-Troller is the only non-resistive controller of which we know. Using “pulse-width modulation” the Heat- Troller sends pulses of current to your heated gear. On higher settings there are longer bursts of current with shorter periods of no current. On lower settings there is logically, more “off time” than “on time”.

The Heat-Troller rotary switch has a tactile off position and an indicator LED that flashes when current is being supplied to your gear, as a visual indicator of the heat setting. When current is being supplied to your gear the LED indicator is lit. So if the LED barley flickers and is then off for a second or two, you know at a glance, the heat setting is very low. If the LED is on and then off for roughly equal moments, you know the heat setting is in the middle of the range. A steady lit LED likewise, means full heat has been selected.

The Heat Troller also now makes a remote control system. No wires running to the controller. You can just zip tie the control to your handlebars for winter riding, take it off for summer riding, too cool. Works with all heat gear. Go to

[removed]

for more info. If my wired one ever goes, I will get one of these units.
 
Last edited by a moderator:
Sounds about like the Gerbing units which operate, visually at least, just like you described. Here is a short blurb from their website.

"Dial in your comfort level with a simple turn of the dial! Unlike older rheostat type thermostats, Gerbing's digital temp controllers draw just enough current to maintain the heat you need. Our Temp Controllers allow you to adjust for your desired heat output of our 12v products."
 
Back
Top