free website stats program Dyna Crossover Gasket – Depth and Fit | Harley Davidson Forums

Dyna Crossover Gasket – Depth and Fit

HD09GN

Member
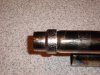
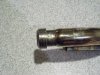
I have a 2009 Dyna Low Rider with stock headers and Rush 1.75 slip-ons. While chasing an exhaust leak I replaced the Interconnect Gasket (65830-03) in the crossover pipe.

In the 2009 Dyna Models Service Manual (99481-09)
under EXHAUST SYSTEM 4.17
under ASSEMBLY: ALL BUT FXDF (page 4-35)
Step 2 states:

Insert new interconnect gasket (5) into crossover pipe bell on rear exhaust pipe (9). Connect rear exhaust pipe to front exhaust pipe (43) at crossover pipe.

My questions:
1) How far down into the crossover pipe bell does the interconnect gasket need to go?
2) How tight is the crossover pipe connection after assembly but before you install it on to bike?
3) Any tips/tricks to ensure the gasket is set correctly?

Thank you.
 
I have a 2009 Dyna Low Rider with stock headers
Any tips/tricks to ensure the gasket is set correctly?

I changed mine on my 2009 FXDL also and I know what you mean. If you don't get the crossover doughnut at the correct depth, you will almost always fight a leak at one of the header pipe to cylinder joints because the spacing of the header pipes won't be correct.

The crossover doughnut on my bike was a very tight fit. The way it says to do it in the manual did not work for me. You may find or come up with a better way, but for me this was the only way that worked.
Leave the slips-ons off the header pipes until the very end. Completely install just the rear header pipe first. Let the rear header pipe seek it own position. Tighten the cylinder exhaust studs and rear support bracket to the correct tightness.

Facing the correct direction, install the new crossover gasket as far as you can on the front header pipe. Now install the front header clamp (65440-06 & 65441-06) to the header pipe but don't attach it to the frame of the bike. Using the front clamp as an anvil, tap (rubber mallet) the front pipe crossover into the rear pipe until the front cylinder head port and front header pipe line up. When they line up, the crossover gasket is at the correct depth..... which on my bike, turned out to be pretty deep.

The net result was a good seal at both header/cylinder gaskets along with crossover gasket. Also no destruction of new crossover gasket was done because of header pipe rotation.
 
Thanks Hoople. Your method sounds much easier than the service manual.

Just to confirm your statement:

install the new crossover gasket as far as you can on the front header pipe.

Crossover gasket should look like attached PIC_A or PIC_B ?
 

Attachments

  • PIC_A.jpg
    PIC_A.jpg
    120.8 KB · Views: 31
  • PIC_B.jpg
    PIC_B.jpg
    161.3 KB · Views: 29
Pict A worked best for me. Installing the rear header pipe first in a "relaxed" position, (nothing else pushing or forcing the pipe into place), resulted in the female crossover connector really being forward.
Therefore when the entire install was over, the crossover connector was totally joined together and the doughnut gasket was deep inside the joining pieces. Also the supporting brackets for both the rear header pipe and front header pipe were just holding the pipe in place like they should and were not being "stretched" or biased in any way.

The first time I tried installing the pipes, I first joined both together at the crossover and then attempted to attach them as a unit to the cylinder heads. Forget that... a total disaster of leaks resulted.

Hope the way I did it works for you also..
 
Back
Top